A couple years ago I wrote a post regarding the WPF VisualBrush. As part of that post I discussed the TileBrush.
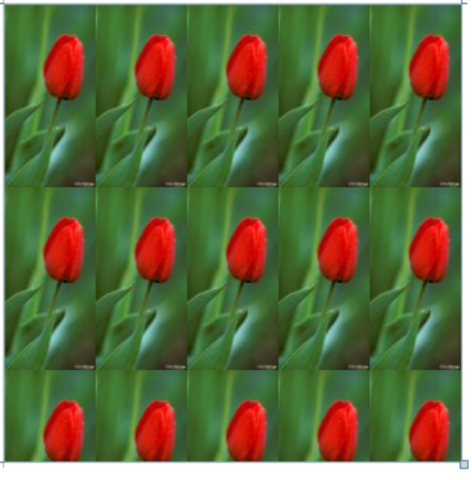
TileBrush is abstract and defines a number of useful properties for creating a repeating pattern. For example you could set the source of the ImageBrush to a picture of a flower, then set properties to repeat the picture in five columns and three rows.
Expression Blend and TileBrush
Now that more developers and designers are adopting Expression Blend it seems like a good idea to learn how Blend handles Tile brushes. For this example I am using an ImageBrush but the similar techniques apply to the DrawingBrush and VisualBrush.
Add an Image to a Blend Project
The first step is to add an image to a Blend project. Right-click the project in Project tab and choose "Add Existing Item". Find an appropriate image and return to the Blend UI.

Insert an Image
Right-click the image in the project tab and choose "Insert". This will add the image to the ArtBoard.


Convert to Brush Resource
Press the ‘V’ key to activate the Selection tool and click the image in the ArtBoard. Choose the "Make ImageBrush Resource" menu item as shown below.

Provide a key (Name) for the ImageBrush resource.

Using the Brush Transform Tool
Delete the existing Image from the ArtBoard. Add another element to the ArtBoard, for this example I am using an Ellipse.

Select the Ellipse with the Selection tool (press the ‘V’ key then click the Ellipse). Select the Properties tab and then choose the Brush Resource.

The ellipse is filled with the ImageBrush.

Transform the ImageBrush
Now it finally time to add columns and rows to the ImageBrush. The Brush Transform tool (press the ‘G’ key) is the tool you are looking for.


Finally choose the TileBrush button in the Properties window and then choose a TileMode value.

You can continue to manipulate the tile in the Artboard. Resizing the Tile smaller adds more columns and row to the result. Dragging the tile in the ArtBoard changes the top/left position of the tile. Lastly you can skew and rotate the tile with the Brush Transform tool


Read Full Post »